Monday, August 8, 2011

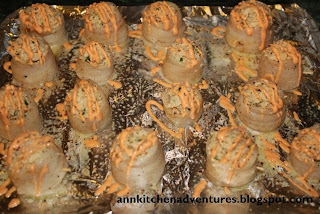
Baked Mussels - Japanese Style (Chem Chep Nuong)

I finally decided to make a video on how to make Baked Mussels. Every time my boyfriend and I would make this dish and bring it to parties, we'd get a lot of compliments and people asking how to make it. We came up with this dish after eating the baked mussels at a restaurant called Kirin. We liked them so much so we decided to recreate this dish at home. This dish is great as an appetizer if you want to bring them to parties or you can just gobble them up all by yourself! Video will be up soon :)

Update: Video will be delayed due to some video issues :/


Ingredients
  • 1 box of mussels with shell (approx. 1.5 lb. or 24 oz, 25 in the box)
  • 2 Tbsp Masago and some extra for top (red-orange fish eggs, you can get it at most Asian/Japanese supermarkets)
  • 5 Tbsp Mayonnaise and 2 Tbsp extra for the top
  • 1 tsp brown sugar (regular is fine if you don’t have brown)
  • 1/3 cup chopped scallions/green onion for top (about 2-3 stalks)
  • (optional) A tiny pinch of salt (the masago and mayo are already salty) 

Step 1
Let mussels thaw out, if necessary, and remove from shell. To clean shells soak in water with salt. Rinse mussels and squeeze out some of the excess water.

Step 2
Chop/Dice 4 or 5 mussels at a time into small pieces (not too small though) and place in a large bowl. If you have a food processor you may dice/chop the mussels in that, but be careful not to over chop/dice them.
*(During this time pour out the salted water that the shells are in and let them dry out)
Then squeeze out more excess water if necessary. Mix in the sugar, then salt, then masago fish eggs, then 5 Tbsp of Mayo. To test the saltiness of the mussels you may put a little bit in the microwave to cook and taste it.

Step 3
Heat oven to 375 degrees F. Prepare a baking tray lined with aluminum foil (easier clean up). Shells should be kind of dry before filling with the chopped mussels. When filling the shells make sure you don’t under or over stuff them. (See pic as reference). Put 2-3 Tbsp of Mayo in a squeeze bottle or a sandwich bag (corner snipped off) and squeeze the mayo on top in a line or squiggly line how ever you want it. Then sprinkle some masago fish eggs on top.

Step 4
Bake in oven at 375 degrees for about 13 minutes, then carefully take out the tray and sprinkle the chopped scallions on top of the mussels and continue baking for the 4-5 minutes. Be careful when doing the scallions… oven is very hot! After 5 minutes, turn off oven, take mussels out and let cool for a few minutes then you can plate them. Good luck and enjoy!

Sunday, July 31, 2011

Lau Thai (Thai Style Hot Pot)

Yesterday was my bf's dad's birthday. We thought it would be nice to cook for his parents, so we decided to make hot pot. It was a huge hit... everyone enjoyed our hot pot. We had a great time chatting while eating our hot pot. Preparations were minimal and clean up wasn't too hard. A perfect night and dinner for less than $40. This recipe makes enough for 6-8 people. Good luck!


Broth:
  • 3 cans chicken broth, 14oz
  • 3 cans water, same can
  • 5-6 Tbsp Tom Yum Soup Paste (see pic)
  • 1-2 Tbsp Tamarind powder base (you can find this in the spice aisle of the Asian supermarket) *amount varies to your taste… use more if you prefer sour, use less if you prefer less sour
  • 2 Tbsp sugar
  • 1 small onion or ½ large onion, sliced
  • 2 tomatoes, sliced into wedges
  • Sate/chili oil (optional)
  • 2-3 tsp Fish sauce (optional)
*depending on your taste, if you like your broth more salty you may want to add a bit of fish sauce


Other Ingredients:
  • Slices of meat (Eye round or rib eye)
  • 1 small Napa cabbage
  • 1 bunch Spinach
  • 2 pk Enoki Mushroom, they’re white, long, and thin
  • 1 pk Fried fish balls, cuttle fish balls, shrimp balls, use whatever you like
  • Quail eggs (1 can should be enough)
  • 1 pk Clams or mussels
  • ½ - 1 lb Shrimp
  • 2-3 filets of Fish, sliced (I use Swai, but you can omit fish if you don’t like fish)
  • Rice noodles (bun), but if you like egg noodles (mi) then use that
  • Electric hot pot or a pot and a portable gas range


Step 1 - Preparing the Broth
In a large pot bring your water and chicken broth to a slight boil, and then add Tom Yum paste, tamarind powder (if you cannot find this then you can just use limes), and sugar. Make sure you stir well to dissolve the seasonings. Taste and if you need more sour add a little more tamarind powder or lime. If the broth is not salty enough for you, then you may add a teaspoon or 2 of fish sauce. If you like your broth spicy, then add some sate/chili oil. Then add the sliced onions and tomatoes and turn heat to low. When you season your food, remember you can add more to it, but you can’t take away… so just add a little bit at a time until you like the taste.

Step 2 - Preparing the other Ingredients
While your broth is keeping warm, you should prepare the other ingredients. Wash your veggies and dry them. You do not have to cut the spinach, but you do have to cut the napa cabbage into 1 ½ to 2 inch slices. Take your meat out of the package and place on a different plate (don’t mix your meats and veggies). I used to use eye round (thit tai for pho), but now I use thin slices of rib eye. It’s sooo much better, trust me! Place clams and slices fish on the meat plate. Open the can of quail eggs and rinse them in water, dry them, and place in another plate. Wash and dry your shrimp, fish balls or cuttlefish balls and place them on the same plate as your quail eggs.
*If you are serving more than 4 people, I suggest splitting the meats and veggies into 2 plates, one for each side of the table, it’s more convenient.

Step 3 - Finishing up
Cook rice noodles/bun as per instructions on the bag. Prepare your plates on the table and split the rice noodles into 2 portions, one for each side of the table. Ladle your broth into the pot that you are using for the hot pot. If you do not have an electric hot pot, you can use a shallow pot and a portable gas range (see pic). Wait for the broth to slightly boil before adding your meats and veggies… and enjoy!

Wednesday, July 20, 2011

Carne Asada Fries

Thanks to my friend Anh, I've been wanting to try carne asada fries. I decided to try and make carne asada fries for the family today, even though I've never had the carne asada fries that are so famous in Sand Diego. It's very similar to nachos topped with carne asada/fajita meat. The final verdict... the family liked the carne asada fries!

French Fries:
3 Potatoes for homemade baked french fries or store bought fries
3 - 4 Tbsp olive oil
½ tsp Paprika
¼ tsp garlic powder
¼ - ½ tsp Salt

You may make your own baked french fries or if you’re lazy you could just buy some from the store. If you choose to make baked fries then keep reading. I chose to do homemade baked fries because they’re a little bit healthier than frying.

Cut potatoes into strips for fries. Soak in cold water for 30 minutes. Put them in a strainer and then dry them off. Preheat oven to 400 degrees F. Place dried fries into a bowl and drizzle with olive oil, paprika, and garlic powder and mix well. Place fries on a baking tray and bake for 15 minutes. Flip the fries and bake for another 15 minutes. Remove from oven and sprinkle with salt (to your taste).
  

Carne Asada:
½ lb Skirt steak for Carne Asada or you could buy seasoned fajita meat
½ tsp paprika
½ tsp onion powder
½ tsp garlic powder
½ tsp cumin
¼ tsp cayenne
¼ tsp black pepper
½ - 1 tsp salt (season to your taste, less for less salty, more for more salty)

If you choose to marinate your own Carne Asada you need to marinate it with the above ingredients an hour or 2 in advance. You can also get the pre-marinated fajita meat from the Mexican market.

After 1-2 hours of marinating in fridge, take skirt steak out and you may either grill or cook on a grill pan. Let cool a little bit before slicing into small pieces (see pic).
 

Other ingredients:
Shredded cheese or nacho cheese sauce (I prefer nacho cheese sauce)
Pico de gallo
Sour cream
Scallions and/or cilantro
Guacamole (optional)

Assembly:
Place hot fries on an oven safe plate. Sprinkle shredded cheese or drizzle nacho cheese on top, then top with carne asada and pop back into your warm oven for a few minutes (I prefer nacho cheese sauce, but all I had on hand was shredded cheese). Carefully take out your plate and top with pico de gallo, sour cream and scallions/cilantro. Serve immediately. Eat it while it’s hot. Enjoy!
  

Tuesday, July 12, 2011

Banh Beo (Steamed Rice Cakes w/ Cotton Shrimp)

Banh beo is another one of my favorite dishes growing up. Even now I still indulge myself in a full plate of banh beo at family parties (oink oink). This dish is not overly complicated to make, but it does take a lot of components. The good news is you can make the extra components ahead of time. I would say that this dish is time consuming, but it is sooo worth it! This recipe yields about 55-60 banh beo. Good luck and enjoy!


Ingredients:
200 gram rice flour (bot gao loc)
20 gram tapioca starch (bot nang)
2 ½ cup water
Pinch of salt (or if you want to get technical, ¼ tsp)
 

Other ingredients/utensils:
Large steamer pot
10-20 small shallow/hollow plate (see pic)
Oil and brush
Tongs
Ladle
Chopped scallions (green onions)
“Cotton Shrimp” (see how to make at the end)
Prepared fish sauce (see recipe)
Pickled shredded carrots (optional)
Mung bean paste (optional/see pics)


Step 1 – Preparing the “batter”
Mix rice flour, tapioca starch, and water and leave in refrigerator for at least 2-3 hours (it’s best if you leave it overnight). After the allotted time, you will see that most of the water has separated to the top. You will need to pour the water into a liquid measuring cup and however much water you pour out (check the measuring cup) you will need to replace that much water. The reason we have to do this is to get rid of the powdery rice taste.

Step 2 – Making the banh beo
Prepare the steamer pot ¾ of the way full of water on high heat and bring to a boil. In the mean time, get your small hollow plates ready by brushing a little oil on each one (see pic). When your water has reached a boil, take your tongs and place the 10 oiled plates into the top part of the steamer and cover. Keep the empty plates in the steamer for 1 minute so the plates can get hot. The reason we do this is so we can get the sunken middle in the banh beo. After 1 minute has elapsed, using a ladle spoon the batter about ¾ way (see pic). Be careful as to not overfill the plates. Place cover on and steam for about 4 minutes… watch the clock or set a timer because you do not want to exceed 4-5 minutes because the banh beo will become flat and soggy. While you wait, oil the next batch of plates. When 4 minutes have elapsed, take the plates out using tongs (they’re hot!). Let the banh beo plates cool for a few minutes then using a plastic fork to remove the banh beo from the plate onto a big serving plate (see pic). While the first set of plates are cooling, place the second set of plates into the steamer for 1 minute and repeat the process until you have used all of the batter.

Step 3 – Plating and topping the banh beo
After you have finished cooking and plating all of the banh beo, all you have to do is place the toppings on top. First spread a little bit of mung bean paste (optional), then spread a little but of the oiled scallions, then lastly sprinkle some shredded shrimp on top. When serving pour a little bit of prepared fish sauce and pickled shredded carrots on top (optional).

Mung bean Paste (optional):
Take ¼ cup of mung bean and soak in ½ cup of water for about 2 hours to soften them. Then in a small pan bring the mung beans to a boil, then lower heat and cover for about 4-5 minutes until they’re soft. Remove from heat and pour out excess water that you used for cooking. Add about 2 Tbsp water and mix well then set aside.

Scallions in oil:
Cut 3 stalks of scallions/green onions, put in a microwave safe bowl and drench them in 1 Tbsp oil and microwave for 1 minute (easiest method).
  
Crushed/cotton shrimp:
There are 2 ways you can make the shrimp topping. One way is if you have medium-large dried shrimp (tom kho), you may put about 10-12 in a blender and “shred” them slightly. Put the shredded dried shrimp into a small pan and toss for about a minute. Then lower heat and add 1 drop red and 2 drops of yellow food coloring to make that beautiful orange red color. Another way to do cotton shrimp is by using fresh shrimp. Take 6 large shrimps clean, devein, and dry them. Pan toss the shrimp until cooked, and then pound them in a mortar or if you’re lazy blend them in a blender slightly. Then add 1 drop red and 2 drops yellow food coloring and mix well. (Note: We used dried shrimp/tom kho)

Prepared fish sauce:
8 Tbsp water
3 Tbsp fish sauce
3 heaping Tbsp sugar
1 Tbsp lemon/lime juice
chopped red chilies (optional)

Combine the ingredients and taste. If it is not to your taste, you may adjust the ingredients… if you want it sweeter, more sour etc. add the appropriate ingredients. Make sure you season it to your taste.

Monday, May 2, 2011

Mi Hoanh Thanh (Wonton Noodle Soup)

One of my favorite noodle soups has to be Mi Hoanh Thanh (Wonton Noodle Soup). I tend to order it ever time I stop by Tan Tan. Since Tan Tan is so far from my house and it gets pretty costly to eat out a lot, I thought why not make it at home. Since my followers are mostly students, I thought why not simplify the process of making the broth. It's almost as delectable as broth made using pork bones. The following recipe yields 4 servings.


All of the following can be prepared in advance except the egg noodles (they have to be used right after you boil them). The broth can be made and frozen for later use. The wontons can be frozen and thawed out for later use. The Xa Xiu can be made and refrigerated up to one week.

Quick 'n' Easy Broth:
  • 3 cans chicken broth (14 oz.)
  • 3 cans water (same can)
  • 1 Tbsp pork flavored soup base (see pic)
  • 1 tsp sugar


Wonton Filling:
*This recipe for wontons makes extra for later use
  • 1 lb. shrimp cut into small pieces
  • 1 lb. ground pork
  • 1-2 tsp salt (if you like your food less salty then only use 1)
  • 2 tsp sugar
  • 1 tsp soy sauce
  • ½ tsp ground pepper
  • 1 tsp sesame oil
  • 1 stalk green onion/scallions, finely minced
  • 2 shallots, finely minced

Other ingredients:
  • Xa xiu (BBQ pork)
  • Noh Char siu/xa xiu seasoning (see pic)
  • Egg noodles
  • Wonton wrapper
  • Cilantro
  • Green onion/scallions
  • Lettuce (green or red leaf works)
  • Chives
  • Bean Sprout (optional)


Step 1 – Preparing Xa Xiu/BBQ Pork
Cut your piece of pork into 1 inch by 2 in. strips (I used pork tenderloin). In a medium sized bowl, mix xa xiu seasoning with 1 tsp soy sauce, 1 tsp sugar. Place pork in the marinade and mix well, then cover with plastic wrap, and let marinate overnight or at least 3 hours. When ready to cook, line a baking tray with a sheet of foil to cover the entire surface (easier to clean later). Bake in oven at 375 degrees Fahrenheit for 30-35 minutes depending on your oven’s strength. When finished, let cool for 5 minutes then slice into thin slices (see pic).
  

Step 2 – Preparing Wonton
In a medium sized bowl, mix together ground pork, shrimp pieces, salt, sugar, pepper, soy sauce, sesame oil, green onion, and shallots. Spoon 1 teaspoon wonton filling into wonton wrapper, then spread a little bit of water around the edges of the wonton wrapper and pinch together. After you’re done making the wonton, you may freeze the extras, but if you layer the wonton in more than 2 layers, you must separate each layer with a piece of plastic wrap. I give each bowl about 6-7 wontons, but it’s up to you how many you want to use.

Step 3 – Preparing the Broth
Pour 3 cans of chicken broth and 3 cans of water into a medium-large pot. Then add pork soup base and sugar. Taste the broth to see if it is to your liking. Keep on medium high heat until ready to serve.

Step 4 – Preparing Wontons and Egg Noodles
In a medium sized pot, fill up halfway with water and bring to a boil. Then with a big spoon carefully drop wontons in the boiling water. Leave them in the boiling water for about 5 minutes or until they start to float. Spoon them out with a slotted spoon or a small handheld strainer (like the one you would use for pho). If some water has evaporated, you might want to add a bit more in and bring back to a boil. Then spread apart one clump of egg noodle and swirl around the strainer in the boiling water for 1 minute. Place each portion of egg noodle in to each bowl.

Final step – Preparing Herbs and Your Bowl
Wash and dry your lettuce, bean sprout, and chives. Assemble them on a plate and set aside. Chop some cilantro and green onion. Place wonton, pork slices and herbs on top of the egg noodles in each bowl. Bring your broth to a boil and serve. Top your noodle soup with shreds of lettuce, chives and bean sprouts. Good luck and enjoy!
 

Thursday, April 14, 2011

Goi Cuon (Spring Rolls) w/ Peanut Sauce

Goi cuon (spring rolls) are so light and yummy in my opinion. They are a perfect appetizer and can be served with either peanut sauce or diluted fish sauce (I prefer peanut sauce though). These spring rolls can be made with shrimp and pork, but since tomorrow is Friday and I can't eat meat, I made mine with shrimp only. Another alternative is using thit nuong (bbq char-grilled pork). This is also verrrry yummy!

Ingredients:

  • Bun (rice vermicelli)
  • Boiled shrimp (I normally use medium/large sized shrimp and use 3 halves for one roll)
  • Rice paper
  • Green leaf lettuce
  • Cilantro
  • Mint leaves
  • Boiled pork (optional)
  • Chives (optional)

Peanut Sauce (enough for about 18-20 rolls):

  • Peanut butter (I use crunchy)
  • Hoisin sauce
  • Siracha (Rooster) sauce
  • Coco Rico (coconut soda)
  • 2 cloves minced garlic
  • 1 tbsp potato or corn starch diluted in a small bowl of water (see pic)

Step 1

Boil water to cook your shrimp (and pork, in a separate pot, if you’re using pork). Boil another pot to cook your vermicelli. Follow instructions on vermicelli package. While water is boiling, wash your lettuce and herbs and set aside to dry. When water boils add shrimp and wait for a few minutes until water boils again. Drain shrimp, let cool, peel, and slice in half length-wise. Prepare all ingredients to wrap your rolls.

Step 2 (optional)

If using pork, cook well, drain, let cool, then slice into thin slices about 1/8 in. Set aside.

Step 3 (see pic if you get confused)

Prepare a bowl of warm water and if you have a spring roll tray (pink, see pic) you may want to use it. Dip rice paper into water and gently shake off excess water. Place rice paper on a plate or your spring roll tray. Place 1-2 pieces of lettuce (depends if you like more or less veggies). Place a fair amount of vermicelli on top of your lettuce, then cilantro, then mint (use whatever herbs you like and as much as you like, but don’t overdo it). If using pork, then you would put the slices of pork in now. Then fold the bottom of the rice paper up and in about 1/3 or a little less than half way. Place shrimp outside down so the pretty color shows through your wrapper, then fold the left and right sides in. Place chives and kind of tightly roll your spring roll, but not too tight for it will break the rice paper.


Step 4

If you are anal like me, you may want to individually wrap each roll in plastic (saran) wrap so they will not stick to each other or just place them apart. When I bring them to work I wrap them individually :D

Peanut sauce time (this is what makes the whole dish)… *drumrolls*

In a small pot, add 1 tsp oil and sautee on medium heat your minced garlic for about 30 sec. to 1 minute. Then add half a can of Coco Rico (6 oz.). Then add 2-3 Tbsp each of hoisin sauce and peanut butter (I use the crunchy kind because it has little pieces of peanuts in it). Mix well, taste (it should be a little salty and a little sweet), when it is to your taste bring to a slight boil and turn heat down to low. Take your starch water and slowly add teaspoons of it to your sauce while stirring moderately (2 tsp of starch water usually thickens it enough). If it becomes too thick, you can always adjust it with the Coco Rico ;)


If you like a little spice squirt a little Siracha (Rooster) sauce (1-2 tsp depending on how hot you like it) into the peanut sauce and slowly mix. Turn off heat and avoid stirring the sauce too much for it will lose its thickness. Let cool for 5-10 minutes and serve with your spring rolls. Good luck and enjoy!

Thursday, April 7, 2011

Ca Nhoi Thit Cua (Crab Stuffed Flounder)

Last week I was feeling a little adventurous and came up with this recipe for Crab Stuffed Flounder, my dish for Lent. I let my parents try it and they loved it! They even asked me to make some more for them this week, since tomorrow is no meat Friday ;) I served my fish with white rice, but this can be served as an appetizer or even a main dish with a side of steamed or pan seared asparagus. Yum! This recipe makes sixteen 1 ½ - 2 inch fish rolls.


Ingredients:

  • 8 filets of Flounder (I used frozen Flounder that I got from Sam’s Club 3 lbs. for $11 and I only used about 1/3 of the bag, you can substitute Talapia if desired, just make sure the filets aren’t too thick)
  • 1 cup lump crab meat
  • ½ cup bread crumbs
  • ¼ onion, finely diced (about 2 Tbsp)
  • 3-4 cloves garlic, minced
  • 3-4 shallots, minced
  • 4 Tbsp Mayonnaise
  • ½ tsp lime or lemon juice
  • ½ tsp garlic salt (or just a pinch)
  • 1 tsp sugar
  • ½ tsp ground black pepper
  • 1 Tbsp chopped cilantro
  • Pinch of paprika
  • 2 Tbsp sliced scallions (green onion)
  • 8 toothpicks, broken in half
  • (Optional) ¼ Green Bell Pepper, finely diced
  • (Optional) Tony Chachere’s Creole Seasoning


Spicy Mayo Sauce:

  • 3 Tbsp Mayonnaise
  • 2 tsp Siracha (Rooster Sauce), use less if you don’t like spicy
  • ½ tsp sugar

*Mix well and put in sandwich bag or squeeze bottle

Step 1

Thaw and clean fish, then cut in half length wise. Lightly sprinkle Tony Chachere’s Creole Seasoning on both sides of fish and set aside. Preheat oven to 400 degrees Fahrenheit.

Step 2

In a medium sized bowl, mix together crab meat, mayonnaise, lime juice, garlic, shallots, onion, bread crumbs, sugar, garlic salt, black pepper, cilantro, bell pepper (optional) and a pinch of paprika (optional).

Step 3

Prepare baking tray (if you want easy clean up, line your tray with foil) and liberally spray Pam (non stick cooking spray) to ensure fish doesn’t stick to the tray. Place your fish in a standing position and make it into a roll (see pic). Then gently fill with crab stuffing while gently pushing down. Then gently secure your fish roll with ½ of the toothpick (see pic). Place each finished roll onto your baking tray.


Step 4

When finished placing all of your rolls, drizzle a little bit of spicy mayo on top. Bake in center rack for 15 minutes. Then carefully move your baking tray to your oven top and drizzle a little bit more of spicy mayo on top. Then carefully place some scallions on top and return to oven and bake for an additional 3 minutes, just until the scallions give off their scrumptious aroma.

Step 5

Carefully remove baking tray from oven and let cool for 2-3 minutes. In the meantime, prepare your plate. Drizzle some spicy mayo on your plate in any pattern you want. Then remove the toothpicks from your rolls and plate them. Enjoy as appetizer or with white rice.